<London Pride>
These days we are presented with different options and price points for utilising on premise or on line services, and as a consultant, I’ve been using different versions of hosted Exchange for the last eight years (my mantra is stick to what you know!); two years ago I migrated to Office 365. With the advent of a new Project Server 2013 on premise installation I decided to utilise my O365 email as an SMTP gateway to receive notifications. Like many IT conundrums the final solution was relatively simple, but to save you the trouble of “binging” and “googling” for a day, this is how you do it.
Overview
1. Install a new SMTP server within your SharePoint farm or existing infrastructure, or utilise an existing one
2. Configure the SMTP server to use O365
3. Verify that you can send emails using the SMTP server to O365
4. Configure Project Server to use the SMTP server
5. Verify that Project Server alerts are working
Please note that I wrote this blog based on Windows Server 2012 and SharePoint/Project Server 2013, but the same principles apply to other versions of Windows/SharePoint/Project Server
Guide
1. Install a new SMTP server within your SharePoint farm or existing infrastructure
In Server Manager, add the SMTP Server feature. I haven’t gone through all of the screen shots here as it’s fairly self explanatory!
2. Configure the SMTP server to utilise O365
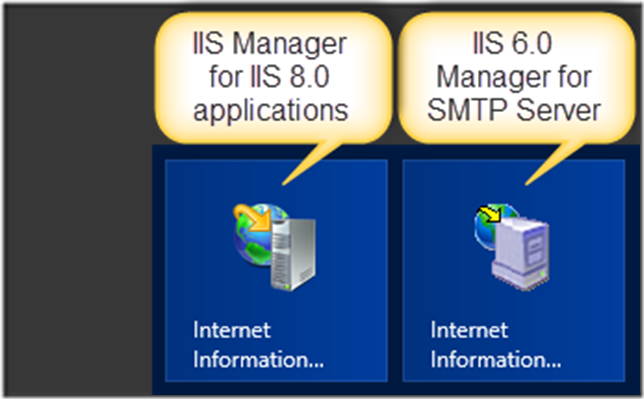
So, on Windows Server 2012, when the SMTP server is installed, it is accessed via the IIS 6.0 Manager. To configure the SMTP server, open the IIS 6.0 Manager. Note that IIS 6.0 manager has a different icon to the IIS already installed IIS Manager.
After opening up the IIS 6.0 manager, configure the SMTP server.
Right click on the [SMTP Virtual Server] name and select Properties.
One the Delivery tab, click on the Outbound Security button.
Enter a valid user name and password. This account must exist within O365, and that this address will be used as the “from” address for Project Server. For production systems, I would suggest a user such as ProjectServer@domainname.com. The TLS encryption option must be checked.
Now click the Outbound connections button, and set the TCP port to 587.
Now click the Advanced button, and enter the fully qualified domain name of your SMTP server.
Ensure that the SMTP Server is started.
Note that when the server is restarted, the service may not start – you may need to set the service to start automatically via services.msc
3. Verify that you can send emails using the SMTP server to O365
It’s a good idea to test that the SMTP server can send emails to O365, and that O365 will deliver those – you do this by using the Telnet command, which may need to be installed.
In Server Manager, add the Telnet Client feature.
Once installed, open a command prompt, and enter the following.
telnet <servername> 25
The server name is the SMTP server
eg telnet locahost 25, or telnet applepark2013.corp.applepark.com 25
If the SMTP Server is up and running, you should get a reply in the format below.
220 applepark2013.corp.applepark.com Microsoft ESMTP MAIL Service, Version: 8.0.
9200.16384 ready at Wed, 19 Jun 2013 14:00:57 +0100
Enter the following.
helo
Enter the following, where the email address is the same as the user name set in the Outbound Security button on the SMTP Server configuration.
mail from:ben@applepark.co.uk
Enter the following, where the email address is the recipient for the email. This can be any valid email address configured on your O365 system.
rcpt to:ben@applepark.co.uk
Enter the following
data
Enter the following
Subject:Test email
This is a test email
.
quit
The whole command window should look a like the following. I’ve highlighted the input, the output from the SMTP server is also shown.
All being well, you should get an email, if not, you are stuck with troubleshooting your SMTP server.
4. Configure Project Server 2013 to use the SMTP server
Project Server now needs to be configured to use the SMTP server. This is now done via SharePoint Central Admin
Click on Alerts and Reminders
And enter the server name for the SMTP mail server and the From address. Note that the From address must be the same as the user name set in the Outbound Security button for the SMTP Server.
5. Verify that Project Server alerts are working
Initiate an alert, the easiest way is to create some new task assignments, or move some existing assignments.
Enjoy, Ben.


