<latte>
It’s been a while since I last discussed Teams and Team Resources, and having learnt something new recently (kudos goes to Eric Uyttewaal who is always very willing to share his expertise) I thought it was time to re-visit the topic.
Introducing Teams
The Team feature was introduced way back in Project Server 2007, and has persisted through to Project Online. The feature consists of the following parts.
1. A Resource Enterprise Custom Field (ECF), called Team Name. This is hard coded in Project Online.
2. A lookup table that is associated with the Team Name ECF. This isn’t hard coded, and in fact, needs to be created as part of the configuration of Project Online.
Why use Teams?
Teams become interesting, when we want to implement any of the following pieces of functionality;
1. We want to Project Managers to assign activities to a Generic Resource, rather than a named individual.
2. We want to easily view the demand and capacity for a team. The work should include all assigned work for the team (both named individuals and the Generic Resource, and the capacity should only be determined from the sum of the named resources.
3. We want team members to “self assign” themselves to the activities.
Set-up – Team
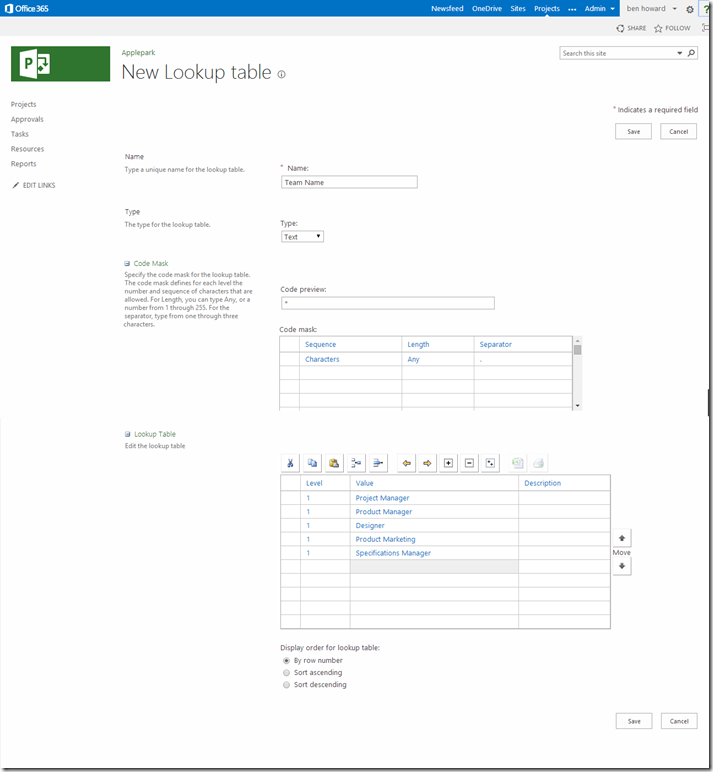
1. The 1st thing to do is to decide upon the teams that you have. Typically this would mirror the business units you have, or the skills that you utilise within the organisation. My team structure is fairly simple, it’s going to consist of the following roles….
Note that I’ve only produced a single level list here, but the list could consist of multiple levels.
2. Once you have decided upon the teams, then these are implemented in Project Server/Project Online by way of a Lookup Table and the pre-existing Team Enterprise Custom Field.
3. Set up the Lookup table by selecting Enterprise Custom Fields and Lookup Tables from the PWA Settings. Notice that there is no Lookup Table associated with the existing Team Name.
4. Click on New Lookup Table to create one to associate with the Team Name. Notice that I’ve called mine “Team Name”, but it can be anything you like.
Once the lookup table has been created, it needs to be associated with the Team Name Enterprise Custom Field.
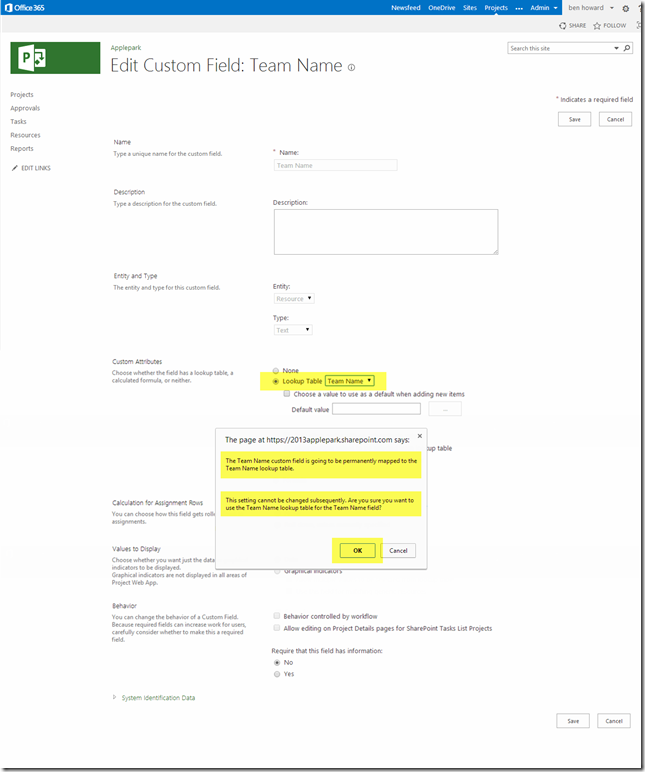
5. Click on the Team Name ECF to edit it. The only thing that needs to be done here is to associate the newly created Lookup Table with the Team Name ECF. Once this is done, it cannot be undone, modified, or edited. Ensure that you get this right, it’s a one hit opportunity! You do get a warning to this effect…
So, that’s the lookup table associated with the Team Name ECF.
Set-up – Generic Team Assignment Resources
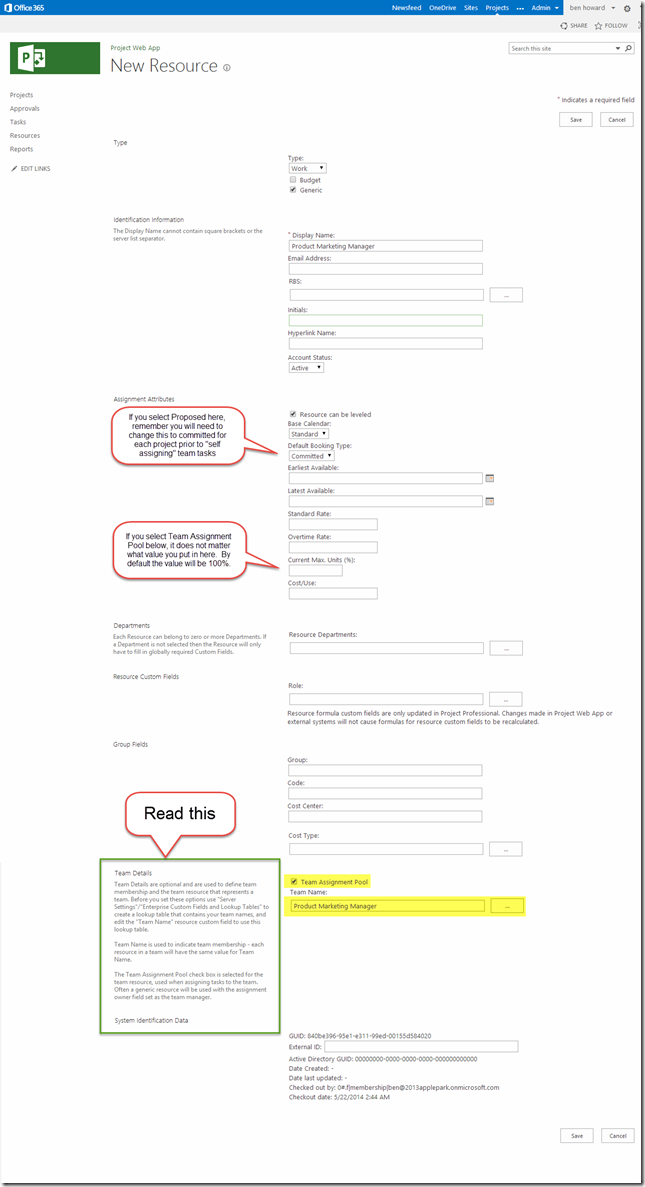
So now that the team structure is set up we can begin to create the Team Resources. This is very similar to creating standard generic resources, but with two following additions….
1. The Team Assignment Pool check-box is selected – this is very important – it sets the capacity for this resource to 0 hours per period.
2. The appropriate Team Name is selected –this is optional, but useful, and in my mind performs two functions.
2.1 It easily allows us to group resources by Team Name, which is a useful function in reports, views etc.
2.2 It allows Team Members to Assign themselves to Team Tasks – This assumes that the Team Member is associated with the same team (and a Team Member can only be assigned to a single team).
We can now see the Generic Team Resources in the Resource Centre…. Note the Max Units (which are set to 100% but will have no impact on capacity), the Team Name and the Team Assignment Pool.
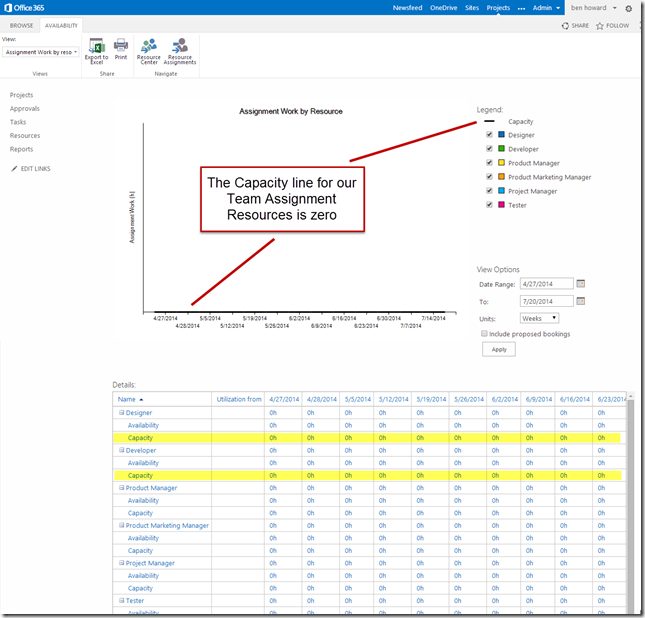
If I select these resources and look at the resource availability then I can see the capacity line is set to zero.
Set-up – Named Resources
Associate each Named Resource with a Team – do not check the Team Assignment pool checkbox.
We can now see the all the Named and Generic resources in the Resource Centre….
and we can group them by team name…
Using these resources etc….
Now that the setup is completed, let’s recap on how these can be used in a fairly typical scenario.
1. The Project Manager creates tasks, and assigns the Generic Team Resource to the task in the usual way….
2. Once the project is published, we can see the demand in the resource centre.
So the neat thing is that I selected all resources that are associated with the Product Manager “team”. Now I can easily see both the demand for each team member (including the individual members) and the supply (represented by the capacity line).
As a the line manager of the Product Manager team, I can now decide whether ben or elaine should fulfil the demand for the Product Manager requirement – the project manager could make the switch by opening the project and changing the assignment. However, in this case, because we have set up the users as Team Resources, we can ask the users to assign themselves to the “team” tasks.
Add Team Tasks
1. Logged in as “ben howard”, the user selects Add Row | Add Team Tasks.
2. Select the task(s), and click on “Assign to me”, and then select Tasks to return to your tasks view.
3. Now complete task statusing as per the usual process.
Note that the Status Manager needs to approve the reassignment of the resource to the team task, and until this happens the resource demand will not be visible in the resource centre. Automatic approvals for reassignment, where the reassignment is from a specific resource, can be setup to run automatically. Here we can see that I have set up an automatic rule that accepts re-assignments from my Team Resources.
Enjoy, Ben.


