17 Oct Managing Sprints in Project
Managing Sprints and Agile in Project
Introduction
This is the second in a two part series covering the Agile capabilities of Microsoft Project. In the first article, we discussed Kanban boards. Now we will look at Microsoft’s Scrum implementation, or, to use the Microsoft terminology, Sprint Projects.
What is a Sprint Project and a Sprint?
A Sprint Project is a Microsoft term that is used instead of Scrum, probably due to naming rights! Scrum is an Agile framework for managing work and projects, aimed at software development teams, and a Sprint is a time boxed iteration, commonly two weeks in duration.
So, a Sprint Project is a project plan, generally focused around software development. It’s comprised of a series of sprints.
See https://en.wikipedia.org/wiki/Scrum_(software_development) for more information.
Checking your version of Microsoft Project
The Agile features are only available in the subscription version of Microsoft Project. The basic features have been available since October 2017 in Version 1710 (Build 8625.2055), but some of the later features (search and % Complete, for example) are very recent additions. What you see will depend on your exact version.
To check which version of Project you’re using, open Project, choose File, and then select Account. Under Product Information, you see the subscription version if you are using it, like so:

To check your current version, go to the About Project button. Here you can find the Version, Build number, and your update channel. You can see below that mine is set to Monthly Channel (Targeted).

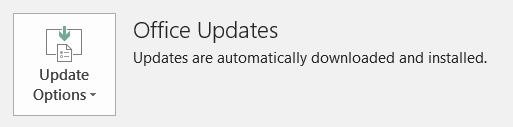
If there are updates waiting to be installed for MS Project, this will be displayed next to the update button. In the image below, you can see that there are no notifications, and therefore, I am already on the latest update available within the Monthly Channel (Targeted).
Assuming that you have a subscription to Project, and that you have a subsequent version to 1710, you’re ready to create a Sprint Project.
What’s Changed Recently?
If you’ve read other articles or have dabbled a little bit already with the Agile features of MS Project, you know that it’s important to be aware of the following user interface (UI) changes that Microsoft has made recently:
- The new Sprints Project template has replaced what was the Scrum Project template.
- The Kanban Project template has been removed, and all references to Kanban have been replaced by Task Board.
- The Agile button, shown in the figure below, which allowed a user to choose the Agile methodology, has been removed also.
Whilst none of these changes affect the current level of functionality, it’s worth being aware of them, as you may see older articles which reference these UI features.
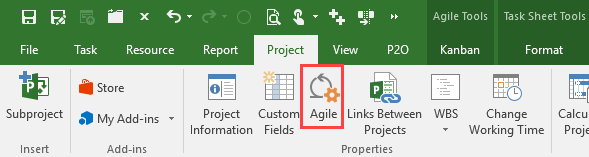
Figure 1 – The Agile button in the Project tab has been removed.
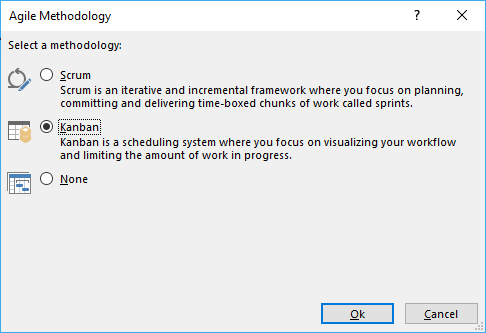
Figure 2 – The Agile Methodology selection dialog box has been removed
It’s worth stating again that these are UI features only, the functionality of the product remains the same. From here on in I will try and solely use the terminology found in Microsoft Project.
Sprint Projects vs Task Board Projects
Remember that Sprint Projects are a superset of a Task Board Project. You can think of a Sprint as a simple time phased layer on top of a Task Board, and therefore, when you use a Sprints, you also get ALL of the benefits of a Task Board Project. A Sprint is really just a time classification for a task.
Creating a Sprints Project
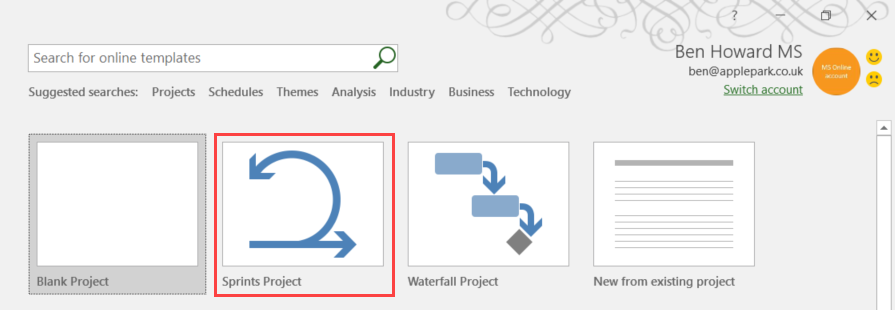
The easiest way to create a Sprints Project is to select the Sprints Project template available from the File | New menu option.
Figure 3 – Select the Sprints Project
Your project tasks will display on the Sprint Planning Boards as shown below (figure 4).
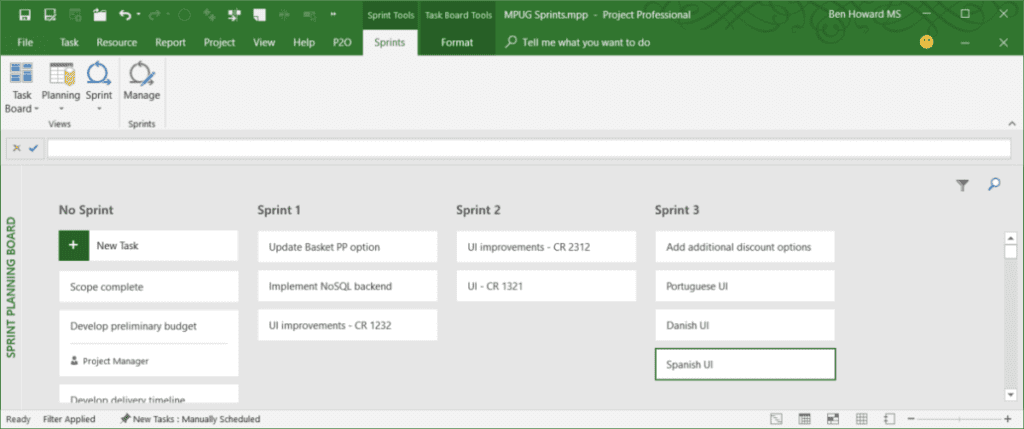
Figure 4 – The Sprint Planning Board view
In order for a project task to display in Sprint Planning Board view, the Show on Board flag for the task must be set to Yes (this is the default setting). This can be set by adding the Show on Board column to the Gantt Chart view. If you don’t want a task to be visible on the board, change the setting to No. Summary tasks will never be displayed on the board, as they facilitate the filtering option, and the flag has no impact for such tasks.
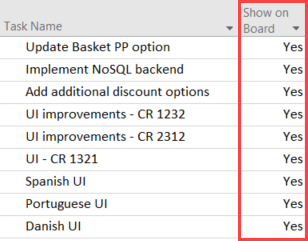
Figure 5 – The Show on Board column in the Gantt Chart view
Setting up Sprints
When you switch to the Sprint Planning Board view, Microsoft creates three sprints for you, starting from today’s date. Each sprint is two weeks long. From a planning perspective, you’ll probably want to change the sprints, so that they start at the beginning of the week, rather than on the current date. To do this:
- Click on the Sprints tab.
- Click on the Manage button.
- Choose the start date for the 1st sprint. The other start and finish dates will change accordingly.
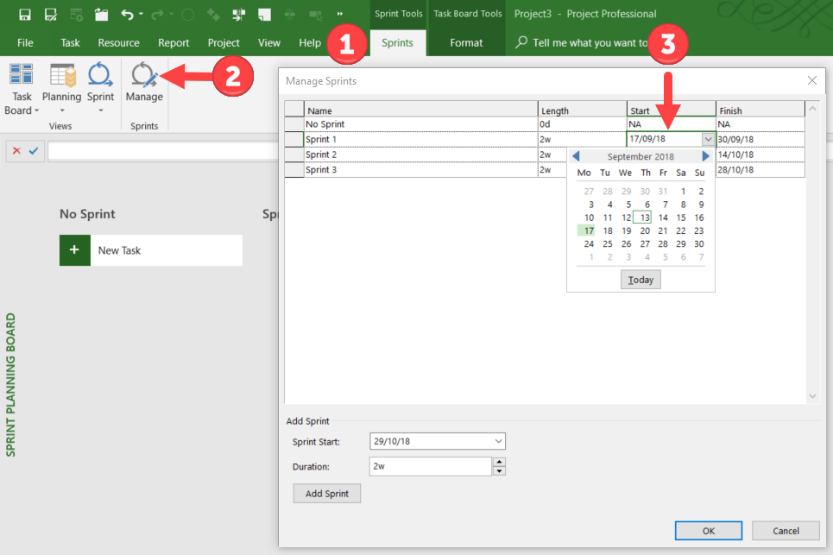
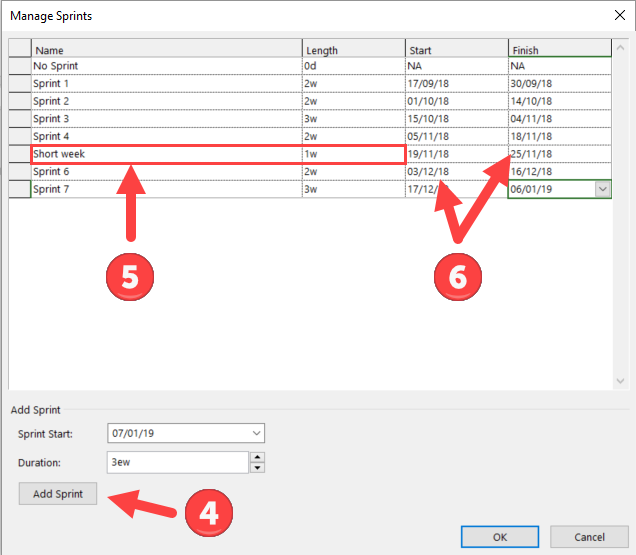
- Click on the Add Sprint button to add additional Sprints. Note that the default duration can be changed (in this case, to “3ew” i.e. elapsed weeks).
- Individual sprints can be renamed and the durations altered, as needed.
- The dates between the finish of one sprint and the start of the next do not need to be consecutive.
Entering Tasks
Now that the Sprints durations have been set up correctly, it’s simply a case of entering tasks directly onto the Sprint Planning Board.
7. Click on the Add Task button, enter the task name, and click Add.
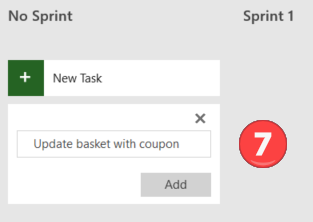
8. Continue adding tasks until you have a full list of tasks for your project, and then move them into the relevant sprint by dragging left or right. Obviously, as things change, you will move tasks between the sprints and add new tasks.

The result is a full list of tasks, grouped by Sprint. Items that have yet to be dragged to a Sprint remain under the No Sprint column. Consider this a holding place for the backlog tasks. Of course, these tasks will be moved to a sprint at a later date.
If necessary, we can perform the same sort of grouping with Summary Tasks as we did using the Task Board views, however because we’ve categorized the tasks by Sprint, this should not be necessary. If you do choose to do so, reference the previous Kanban article.
There are plenty of other Sprint views available to us, and it’s worth exploring these.
9. Select the Planning button from the Sprints tab, and then select the Sprints Planning Sheet.
10. This view allows us to assign resources, modify the work value, and change sprints for tasks.

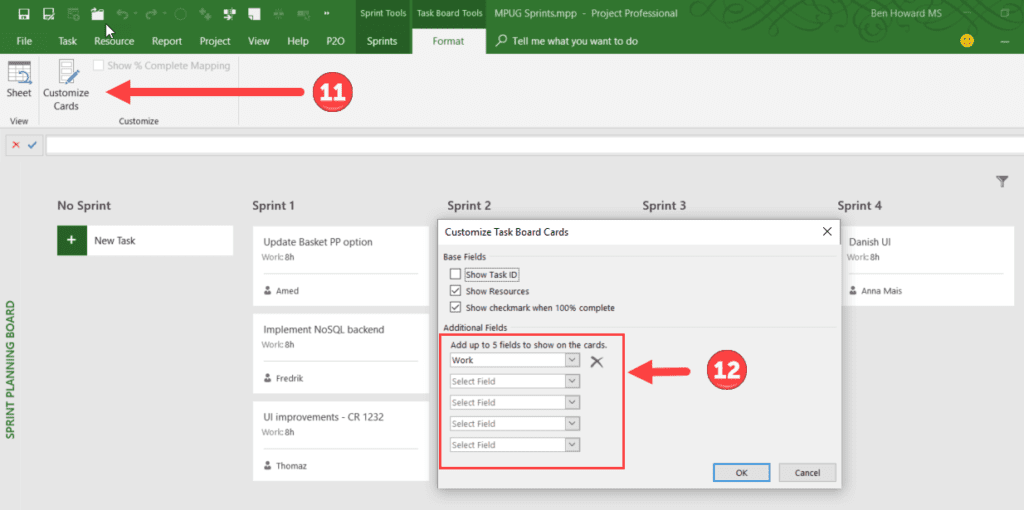
We can also change what is displayed on the Task Board Cards:
11. Select the Task Board Tools Format tab and then select Customize Cards.
12. Choose which fields to display.
Filters and searching
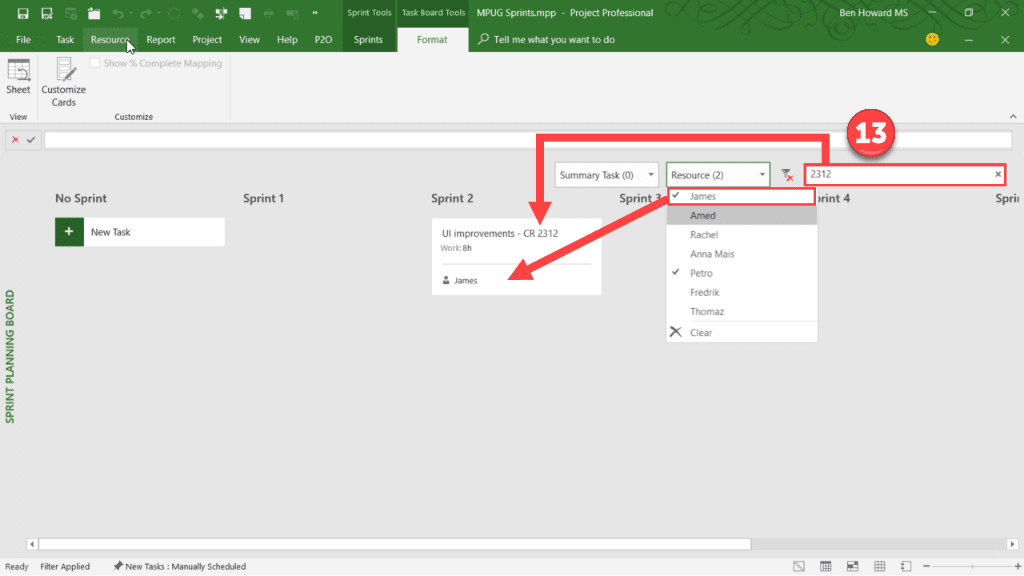
So far, I’ve entered a lot of data, including summary tasks and resources. If I’ve got more than say a dozen tasks (and let’s face it, if I just had a dozen tasks I’d used Excel or Wunderlist) then it’s difficult to view all of these tasks on the task board view; this is where filtering and searching come in. I can use the Filter button to only display the tasks belonging to one or more summary tasks, or associated with one or more resources. Having applied a filter, I can further refine my query by using the search button. The searching and filtering functions allow me to quickly find the tasks or resources that I’m interested in.
13. Select one or more Summary tasks, and one or more resources using the dropdown menus from the Filter button. The tasks displayed on the Task Board view are filtered accordingly.
Progressing Tasks
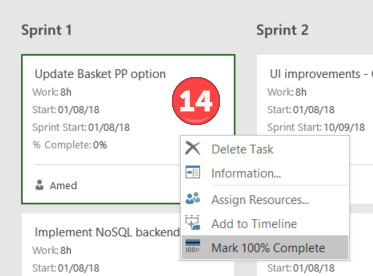
We’re now at the point where we can begin working on the tasks and therefore progressing them. We can do this in a couple of ways. The first is to simply mark the Tasks as 100%, but remember that a Sprint Project is a superset of a Task Board Project, and so we could also move each task through a Task Board if we desired. Everything that was detailed in the previous article regarding Task Boards is relevant in this case.
14. Right-click on a task to mark it as 100% complete. Note that when the view is refreshed, completed tasks are not displayed on the Sprint Planning Board.
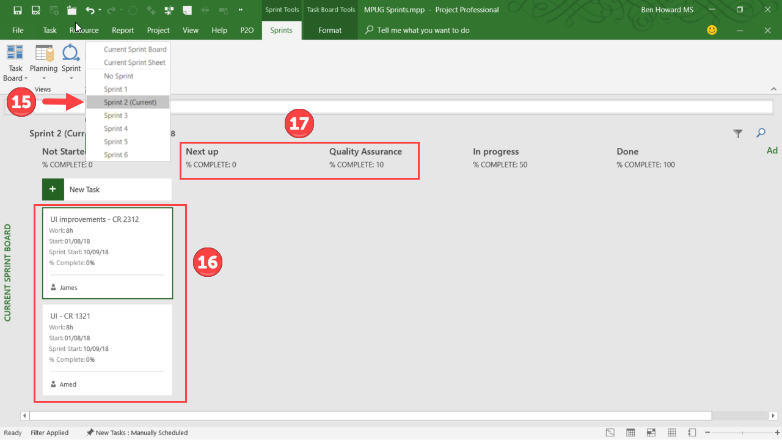
15. Click on the Sprints tab, and then select the Sprint button. Select which Sprint to view from the menu.
16. The tasks in the Sprint are displayed on the Sprint Board.
17. The columns on the Sprint Board are the ones that we previously saw (in the Kanban article), so each task within a sprint can be managed on a task board. Remember that a Sprint Project is really just an additional layer on top of a Task Board Project.
Reports and Printing
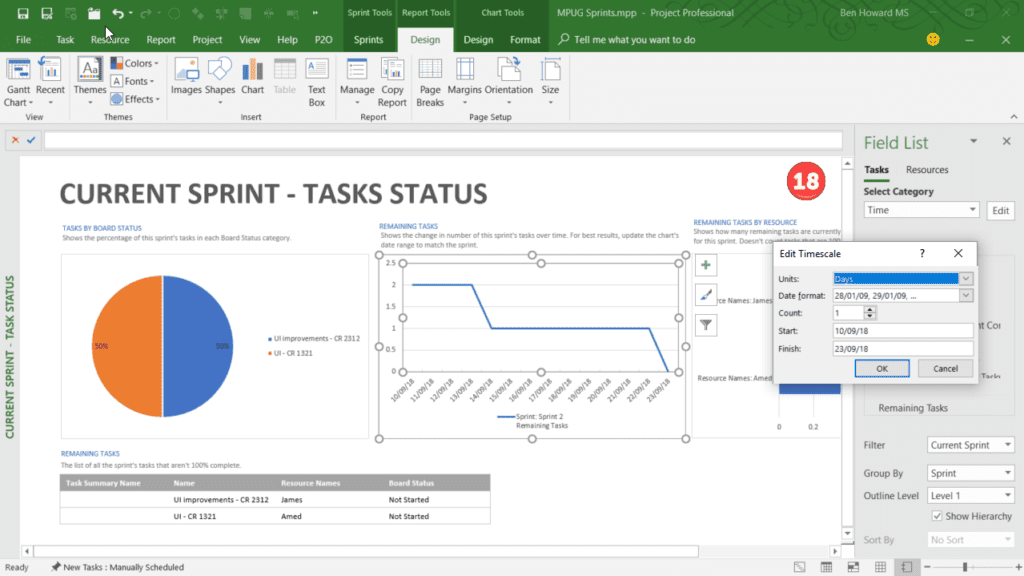
One of the key requirements of any project manager is to provide timely and accurate reports. Microsoft has created three Sprint Board reports: one that focuses on the task status, another which focuses on the work status, and a third that provides an overview of all of the Sprints. Of course, these are in addition to all of the standard reports that are provided out of the box. You can use these reports as provided or use them as a basis for setting up your own customized reports.
The reports are available on the Report tab within the Task Boards button.
18. Navigate to the Report tab, and then click on the Current Sprint– Task Status from the Task Boards reports button. Notice that the layout of the report can be easily changed. In order to get the Remaining Tasks chart to display correctly, the timescale should be changed to match that of the Sprint.
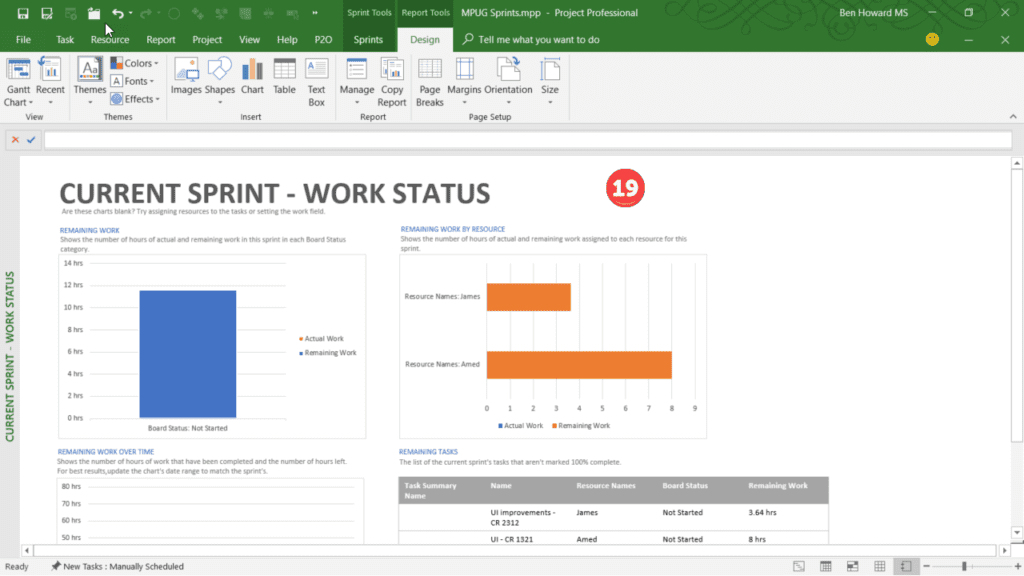
19. Now navigate to the Current Sprint – Work Status report. This report is more focused towards resources and who is doing what.
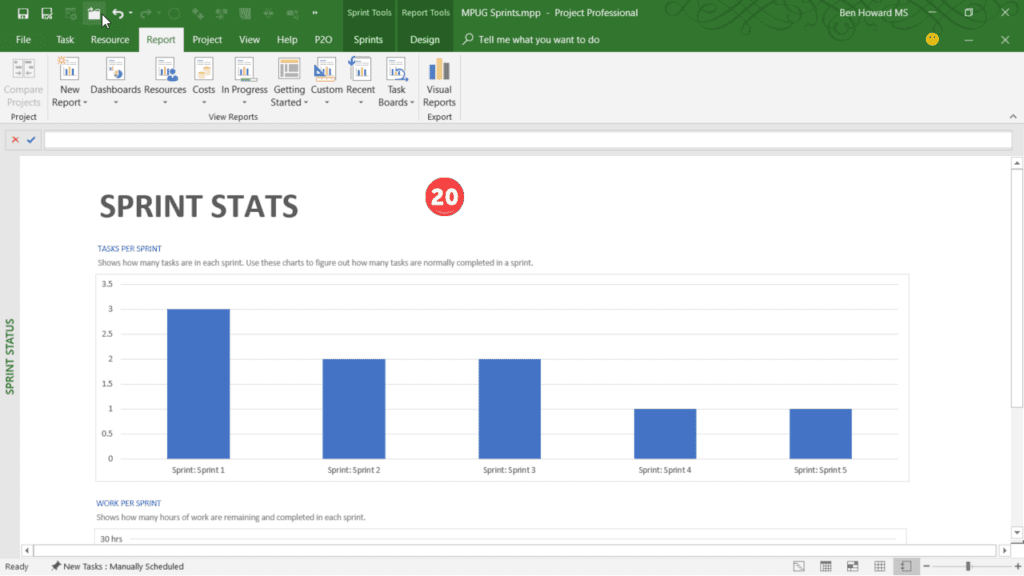
20. The final report is the Sprint Status report, which simply shows two tables, the first displaying the number of tasks per sprint, and the second displaying the work per sprint.
Summary
Within this article, I have explored using Microsoft Project to run a Sprint Project, which really provides an additional layer above a Task Board Project. It’s very simple to combine the two methods together, and when you do, you’ll get a rich and versatile toolset for managing Agile projects. It’s then possible to combine these methods with a traditional waterfall project. Yes, you can have the best of both worlds. If you want to check out the plan that I used to create the article, it’s available for download here.