<Tuborg>
Using Kanban Boards in Microsoft Project
Introduction
There has been a lot written over the last year regarding Microsoft’s foray into the world of Agile Project Management by way of new improvements into Microsoft Project. This article provides an update based upon one of the latest versions, discusses what’s changed recently, and provides a walkthrough on setting up and using the Kanban Board. Please note that for those people who are more interested in Sprints and Scrum, this will be covered in depth in a subsequent article.
What is a Kanban Board?
A Kanban Board is a technique that allows us to visualize and show how work moves from left to right. Each column on the board represents a stage of the overall process, or to be more precise the system that is visualized by the board. On a physical board the team pulls cards (each card represents a task) from one column to another, to the right, to show progress. The columns on the board represent the state/stage of the task.
Examples of stages include
• Waiting, Work in progress, and Completed
• Backlog, Ready, Coding, Testing, Approval, and Done
• Next, In Development, Done, Customer Acceptance, and Live
See https://en.wikipedia.org/wiki/Kanban_board for more information.
Checking your version of Microsoft Project
The Agile features are only available in the subscription version of Microsoft Project and have been available since October 2017 in Version 1710 (Build 8625.2055).
To check which version of Project you’re using, open Project, choose File, and then select Account. Under Product Information, you have the subscription version if you see the following:

To check your current Version, check the About Project button. Here you can find the Version, Build number and your update channel; you can see mine is set to Monthly Channel (Targeted).

If there are updates waiting to be installed for Project, then this will be displayed next to the update button. In the image below you can see that there are no notifications and therefore I am already on the latest update available within the Monthly Channel (Targeted).

Assuming that you have a subscription to Project and you have a subsequent version to 1710, then you’re ready to create a Kanban project.
https://support.office.com/en-us/article/use-task-boards-in-microsoft-project-online-desktop-client-1b9b44d7-fd8e-4b3b-ab94-2b97deb9945b?ui=en-US&rs=en-US&ad=US
Where’s my Kanban button gone?
If you’ve read other articles or have dabbled a little bit already with the Agile features then you will know need to be aware of the following user interface (UI) changes that Microsoft have made recently
1. The new Sprints Project template has replaced what was the Scrum Project template.
2. The Kanban Project template has been removed and all references to Kanban have been removed and replaced by Task Board.
3. The Agile button (Figure 1) which allowed a user to choose the Agile methodology (Figure 2) has been removed.
Whilst none of these changes affect the current level of functionality, it’s worth being aware of the changes because you will continue to see older articles which reference these older UI features.

Figure 1 – Agile button in the Project tab
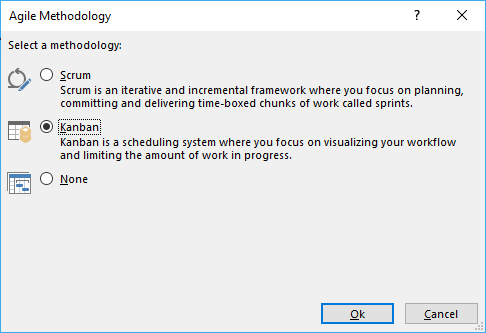
Figure 2 – Agile Methodology selection dialog box
It’s worth stating again that these are UI features only, the functionality of the product remains the same. From here on in I will try and solely use the terminology found in Microsoft Project.
Switching and setting up the Task Board view
To use a Kanban Board you need to select Task Board view. It’s worth noting that the Kanban features sit nicely alongside the traditional waterfall features, so you can take an existing project and view it in a Kanban Board.
Open your project, and then, on the View tab, in the Task View section, select Task Board.
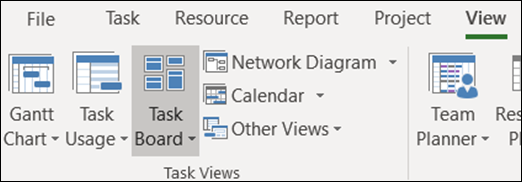
Figure 3 – Select the Task Board view
Your project tasks will display as boards in the Task Board view (figure 4).

Figure 4 – The Task Board view
It’s worth noting that in order for a project task to display in Task Board view, the Show on Board flag for the task must be set to Yes (this is the default setting); this can be set by adding the Show on Board column to the Gantt Chart view. If you don’t want a task to be visible on the board, change the setting to No. It is also worth noting that Summary tasks will never be displayed on the board, they facilitate the filtering option and so the flag has no impact for Summary tasks.
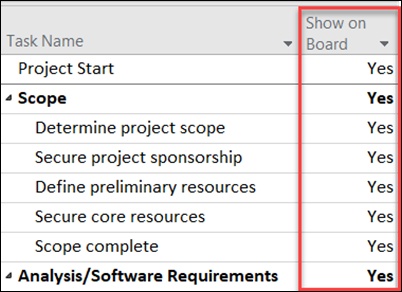
Figure 5 – The Show on Board column in the Gantt Chart view
Setting up Column Names and Board Options
When you switch to the Task Boards view the first real choice you must make is whether to keep the default column names or change them to suit your process. I’m going to add in a new column called Quality assurance to my column list.
1. Click on the Add New Column button

2. Enter the Column name, and then right click on it to display the column options of renaming, deleting or moving the column to the left or right.

3. In this instance I’m going to move the column to the left and place it between Next up and In progress.

4. It’s also worth noting that the column names you enter here are mapped to a task field called Board Status which can be viewed (and changed per task) in any task centric table.
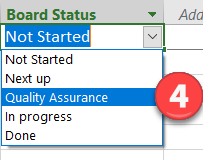
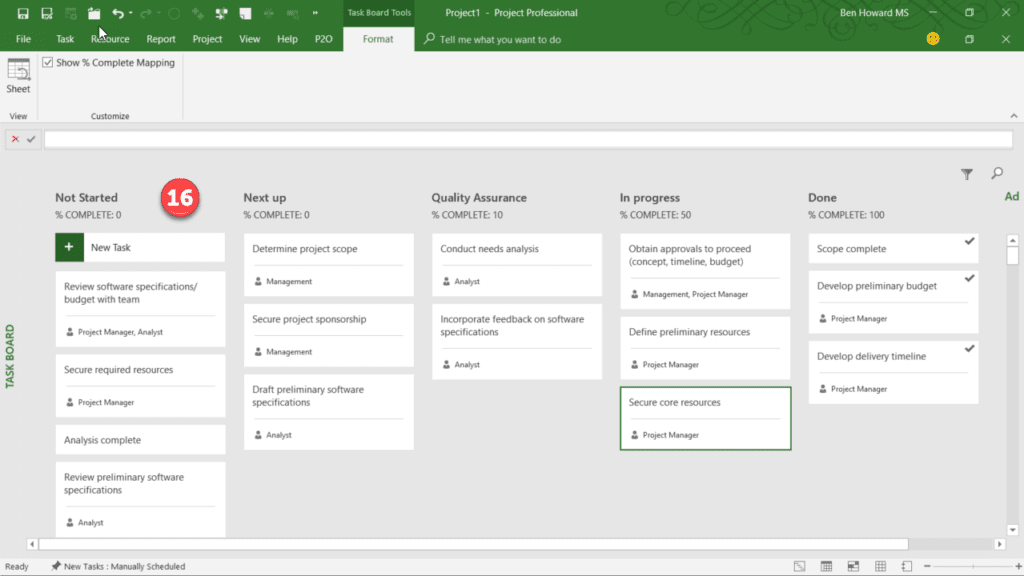
5. One last thing to do and potentially set up is to decide whether moving the tasks between columns should update the % Complete field for each task. If you do want this to happen, then simply enter the % Complete to be assigned under each column header. Note that the default column of Done already has a % Complete set to 100.
6. If you don’t want to use the % Complete fields then leave them unset and uncheck the Show % Complete Mapping option in the Task Board Tools Format tab.

Entering Tasks
Now that the Task Board view has been set up correctly, it’s a simple case of entering tasks directly onto the board.
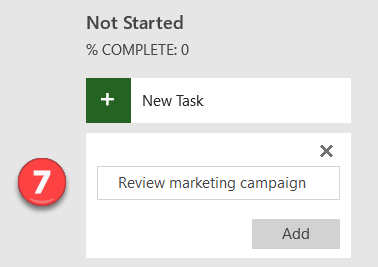
7. Click on the Add Task button, enter the task name, and click Add.
8. Continue adding tasks until you have a full list of tasks for your project.
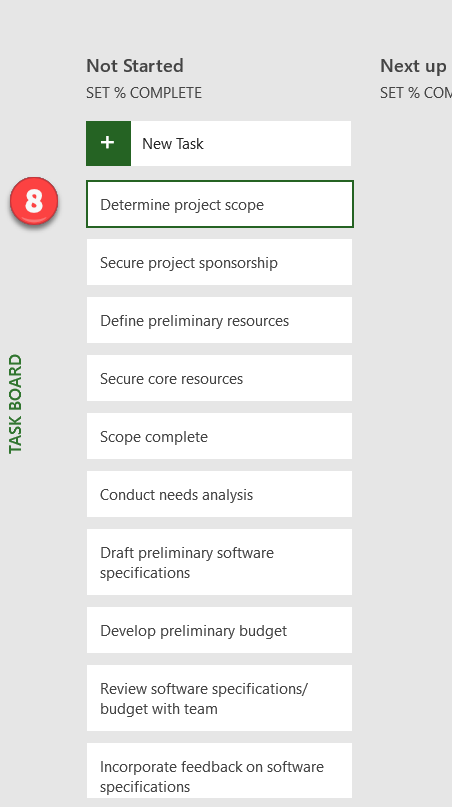
What we now have is a flat list of task names, and this is fine where we don’t have too many tasks, but projects have a habit of morphing and changing quite a bit, and so we can organise these tasks using summary tasks. In order to create summary tasks we have to switch away from the Task Board view to the Task Sheet view.
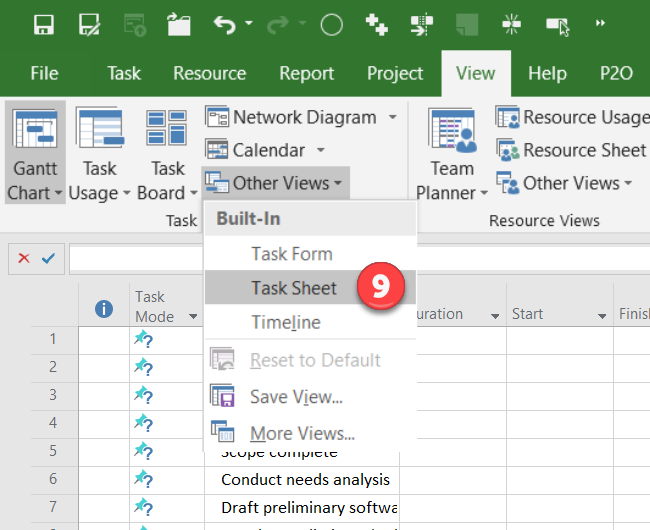
9. Select the Task Sheet from the View tab, Other Views menu.
10. Now insert summary tasks in the usual manner, just as you would if you were creating a standard “waterfall” project. Typically, I do this by inserting tasks then then using the Indent button; by default summary tasks are set to be Auto Scheduled whereas the non summary tasks are still Manually Scheduled.
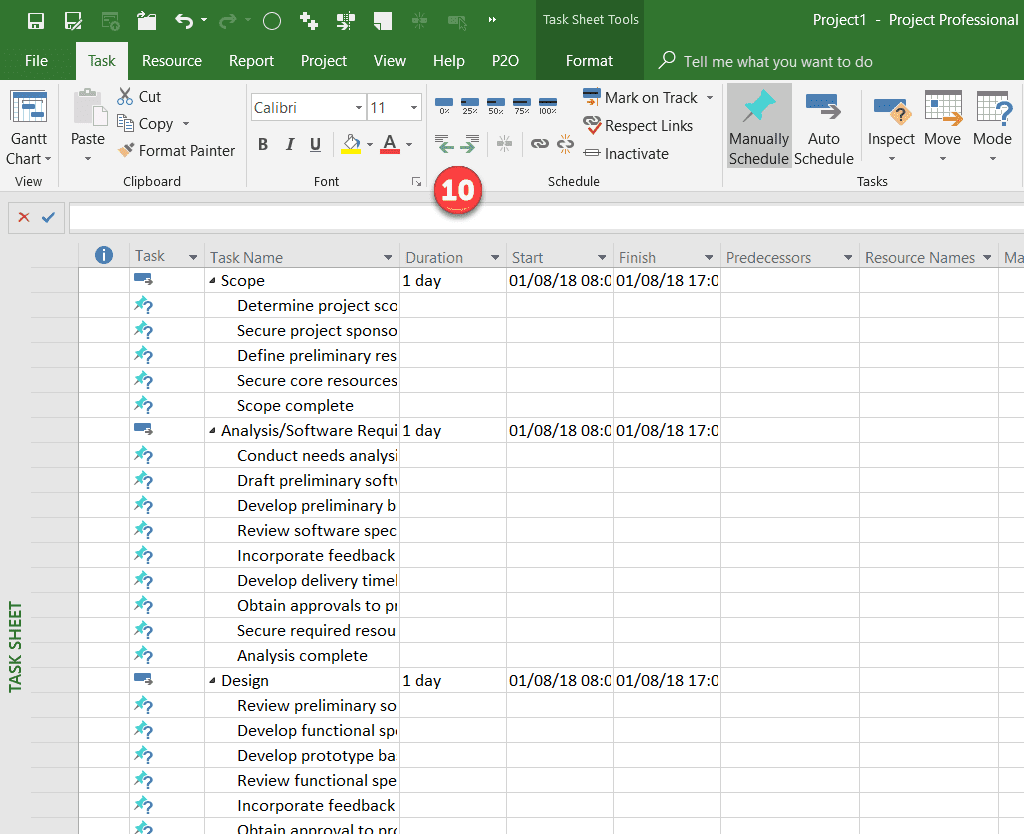
11. Once the summary tasks have been entered, then we can then begin to use the filtering options in the Task Board view, but more on that later.

Assigning Resources
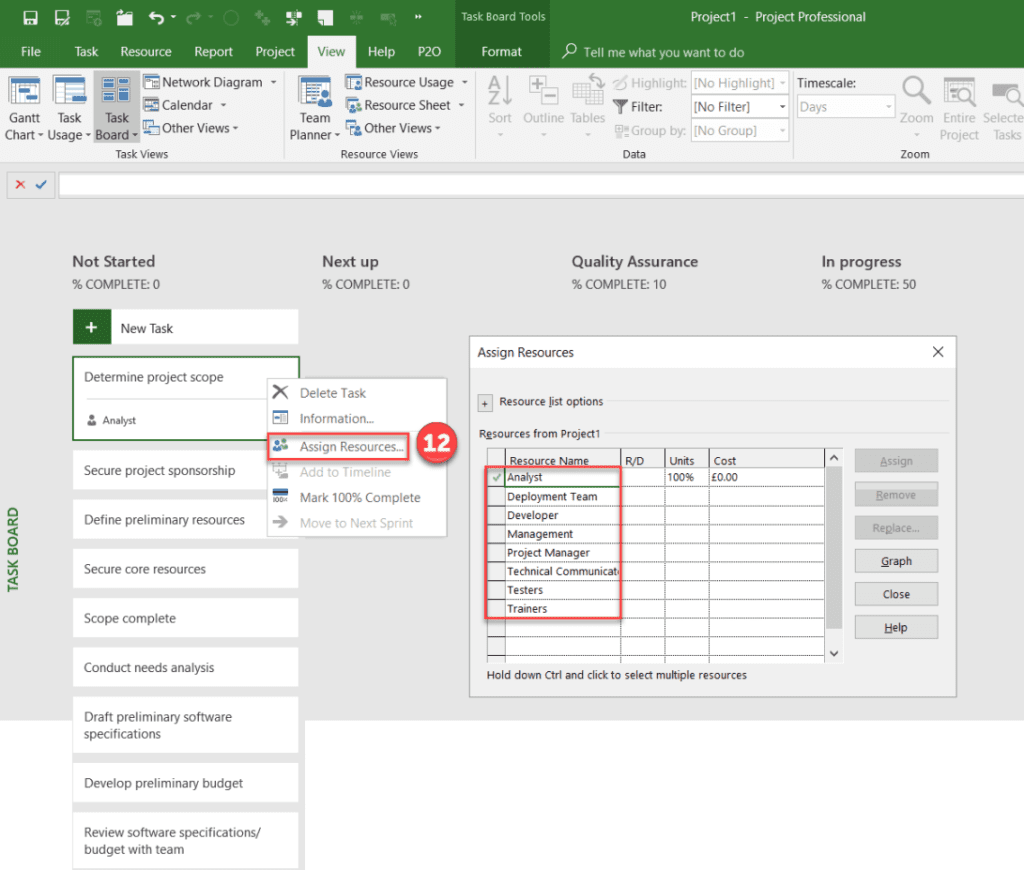
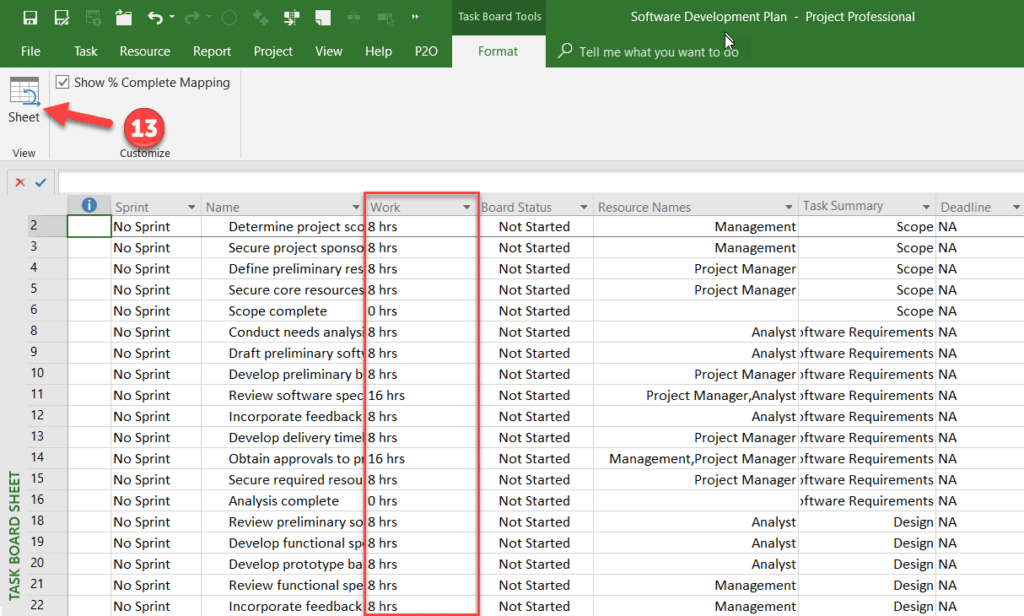
One of the properties of a Kanban board is to do some simple resource assignments so that we can see who is performing or owns each task or activity. Assigning resources can be performed in the Task Board view. For this project, I want to assign resources for the majority of tasks. Initially the list of resources will be blank, but you can just type them into the Assign Resource dialog box, and they will populate onto the resource sheet. Note that once resources are assigned to tasks, the work value will be populated. This value can be viewed on the Task Board sheet.
12. Within the Task Board view, right click on a task, and choose Assign Resources. Enter the resource name(s) into the Assign Resources dialog box and click on the Assign button. Repeat this process for each task that you want to assign resources to.
Modifying the Work Value
When resources are assigned to tasks, a work value is created for each task. If you want to modify this value because you are estimating work and tracking it, then this is best done in the Task Sheet View.
13. From the Format tab on the Task Board view, select the Sheet button to display the Task Board Sheet. Alter the Work value as required for each task.
Filters and searching
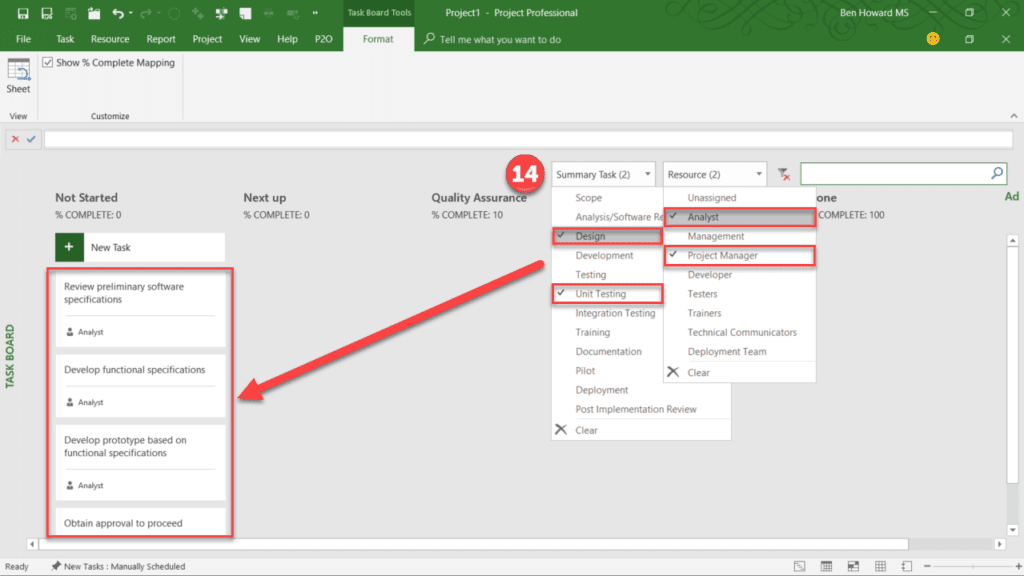
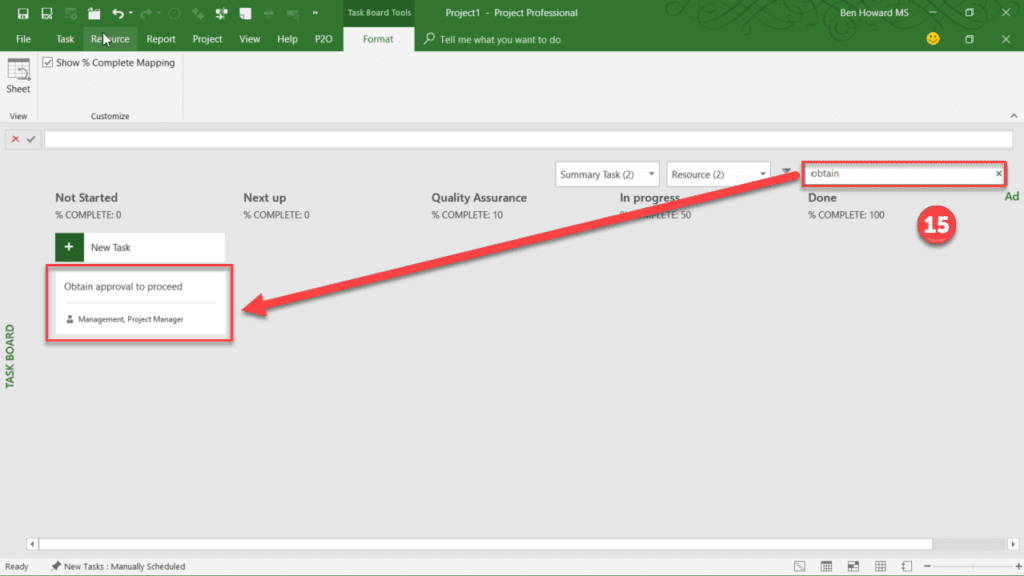
So far, I’ve entered a lot of data, including summary tasks and resources. If I’ve got more than say a dozen tasks (and let’s face it, if I just had a dozen tasks I’d used Excel or Wunderlist) then it’s difficult to view all of these tasks on the task board view; this is where filtering and searching come in. I can use the Filter button to only display the tasks belonging to one or more summary tasks, or associated with one or more resources. Having applied a filter, I can further refine my query by using the search button. The searching and filtering functions allow me to quickly find the tasks or resources that I’m interested in.
14. Select one or more Summary tasks, and one or more resources using the dropdown menus from the Filter button. The tasks displayed on the Task Board view are filtered accordingly.
15. Use the Search button to further refine the displayed task list within the Task Board. The search is applied to all tasks within the current filtered list, and searches both the task name and the resource name. The search is not case sensitive.
Progressing Tasks
We’re now at the point where we can begin working on the tasks and therefore progressing them on the Task Board tasks. This is simply a case of dragging and dropping the tasks from the Not Started column to the relevant columns on the right. If you have set a % Complete value for each column, then these percentages will be set for each task as you drop them into the column.
16. Drag the tasks to the relevant column as the tasks progresses.
Reports and Printing
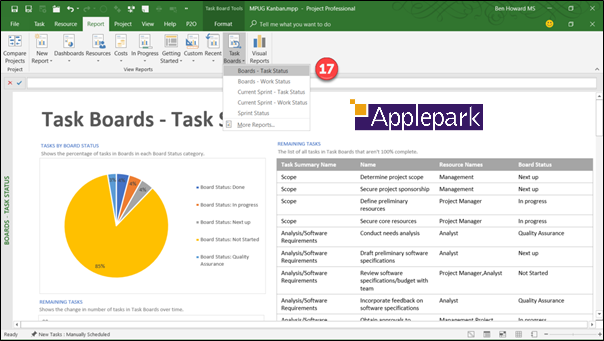
One of the key requirements of any project manager is to provide timely and accurate reports. Microsoft have created two task board reports, one that focus on the task status, and another that focuses on the work status (these are in addition to all of the standard reports that are provided out of the box). You can use these reports as provided or use them as a basis for a set of your own customized reports.
The reports are available on the Report tab within the Task Boards button.
17. Navigate to the Report tab and click on the Boards – Task Status within the Task Boards reports button. Notice that the layout of the report can be easily changed, in this case I have added the Applepark logo.
18. Now navigate to the Boards – Work Status report. This report is more focused towards resources and who is doing what.
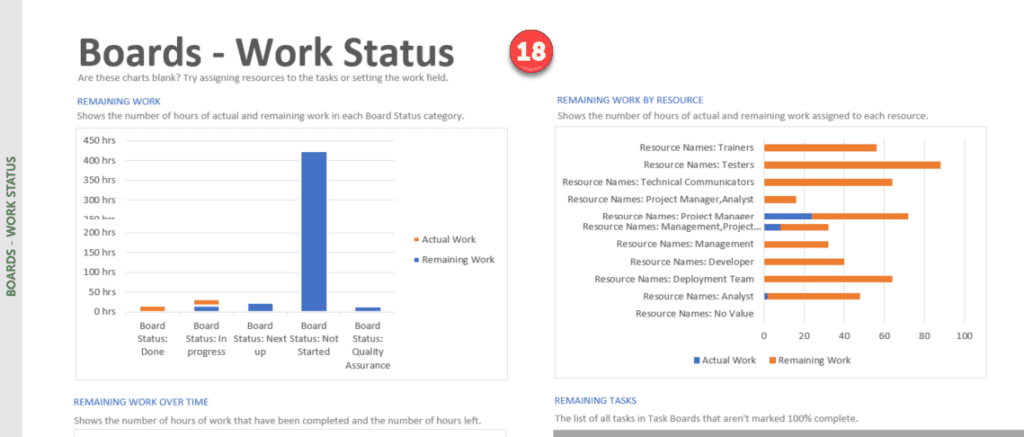
Both reports can be edited and printed off (something you cannot do from the Task Board) and of course are updated as the project is updated. One thing that I don’t like on either report is the Remaining Work Over Time and the Remaining Tasks Over Time graphs, as they just display invalid data, unless I am prepared to finesse the project schedule somewhat, which for a simple Kanban plan I wouldn’t be prepared to do.
Summary
Within this article I have explored using Microsoft Project to run a project using the Task Board, aka the Kanban board. This is probably one of the simplest methodologies open to us when managing a project, and you can see how I’ve managed to setup, enter, track and comprehensively report on a project within a few steps.
Please keep an eye out for my next article which will cover off using the Scrum methodology within Project, and please feel free to download the associated .mpp plan that I used to produce the screen shots by clicking here.
Good luck, Ben